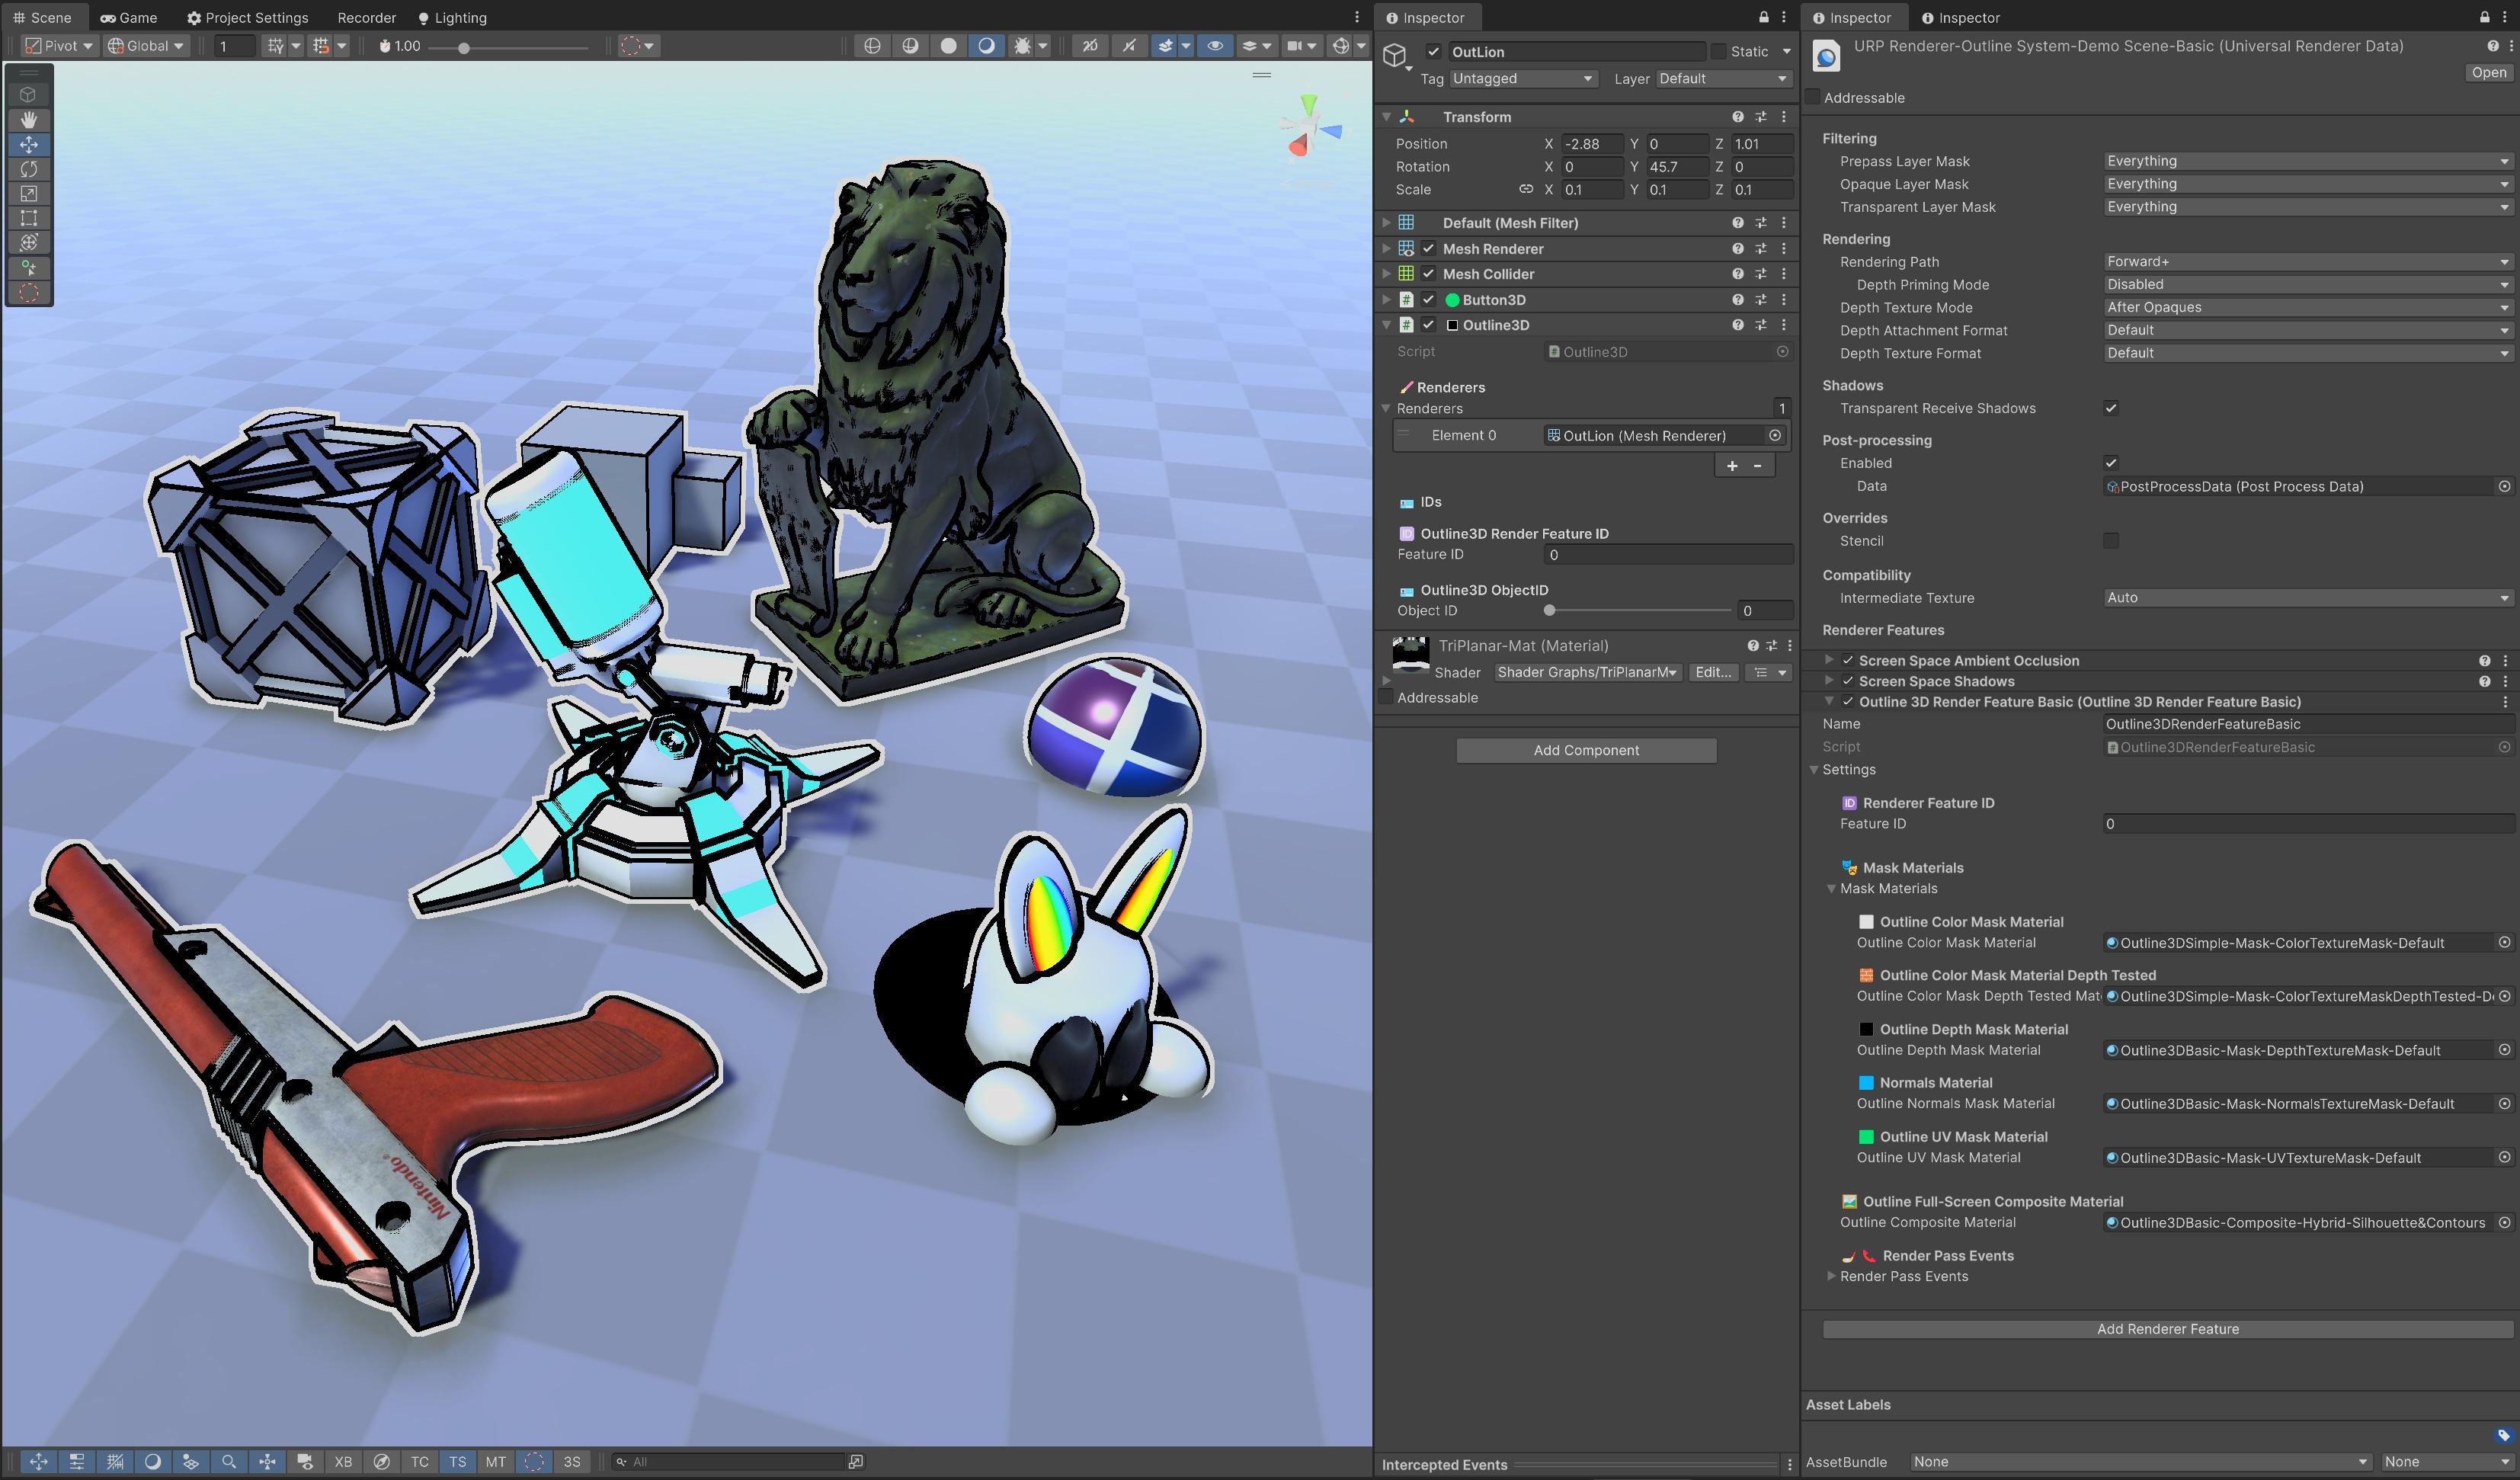
🔳 CosterGraphics.Systems.OutlineSystem
👟 Quick-Start Guide
Follow the steps below to add the OutlineSystem to your Unity URP project.
- 1️⃣ Add the
🔳Outline3DComponent to a GameObject - 2️⃣ Add the Outline Renderer Feature to Your URP Renderer
- 3️⃣ Create and Assign a Simple Composite Outline Material
- 4️⃣ Test the Outline in Play Mode
1️⃣ Add the 🔳Outline3D Component to a GameObject

Steps:
Select a GameObject in the Scene View or in the Hierarchy.
In the Inspector press the Add Component button and add the
🔳Outline3Dcomponent to your GameObject.
(Not to be confused with the native Unity Outline component, which is for 2D UI elements.)Assign the MeshRenderer and/or child MeshRenderers to the
🔳Outline3Dcomponent's Renderers list.
(Currently the system supports MeshRenderers and SkinnedMeshRenderers)
ℹ️ Any GameObject with an
🔳Outline3Dcomponent becomes outline-eligible.
ℹ️ The
🔳Outline3Dcomponent itself does not perform rendering, it only registers its Renderers with the🧑🎨Outline3DRenderFeatureand stores per-object data, like🪪ObjectIDand🆔FeatureID.
ℹ️ The
🔳Outline3Dcomponent has to be enabled or it won't be drawn into the Renderer Feature's texture masks and won't receive any outlines.
2️⃣ Add the Outline Renderer Feature to Your URP Renderer
PC_RPAsset (Universal Render Pipeline Asset)
Renderer List:
PC_Renderer (Universal Renderer Data)
Renderer Features:
Screen Space Ambient Occlusion (Scriptable Renderer Feature)
Outline3DSimple-Msk-ColorTextureMask-Default.shadergraph
Outline3DSimple-Msk-ColorTextureMaskDepthTested-Default.shadergraph
🖼️Final Composite Material:
Outline3DSimple-Cmp-Silhouette-Outside-Default.shadergraph
(Or any other Simple tier Composite shader)
Steps:
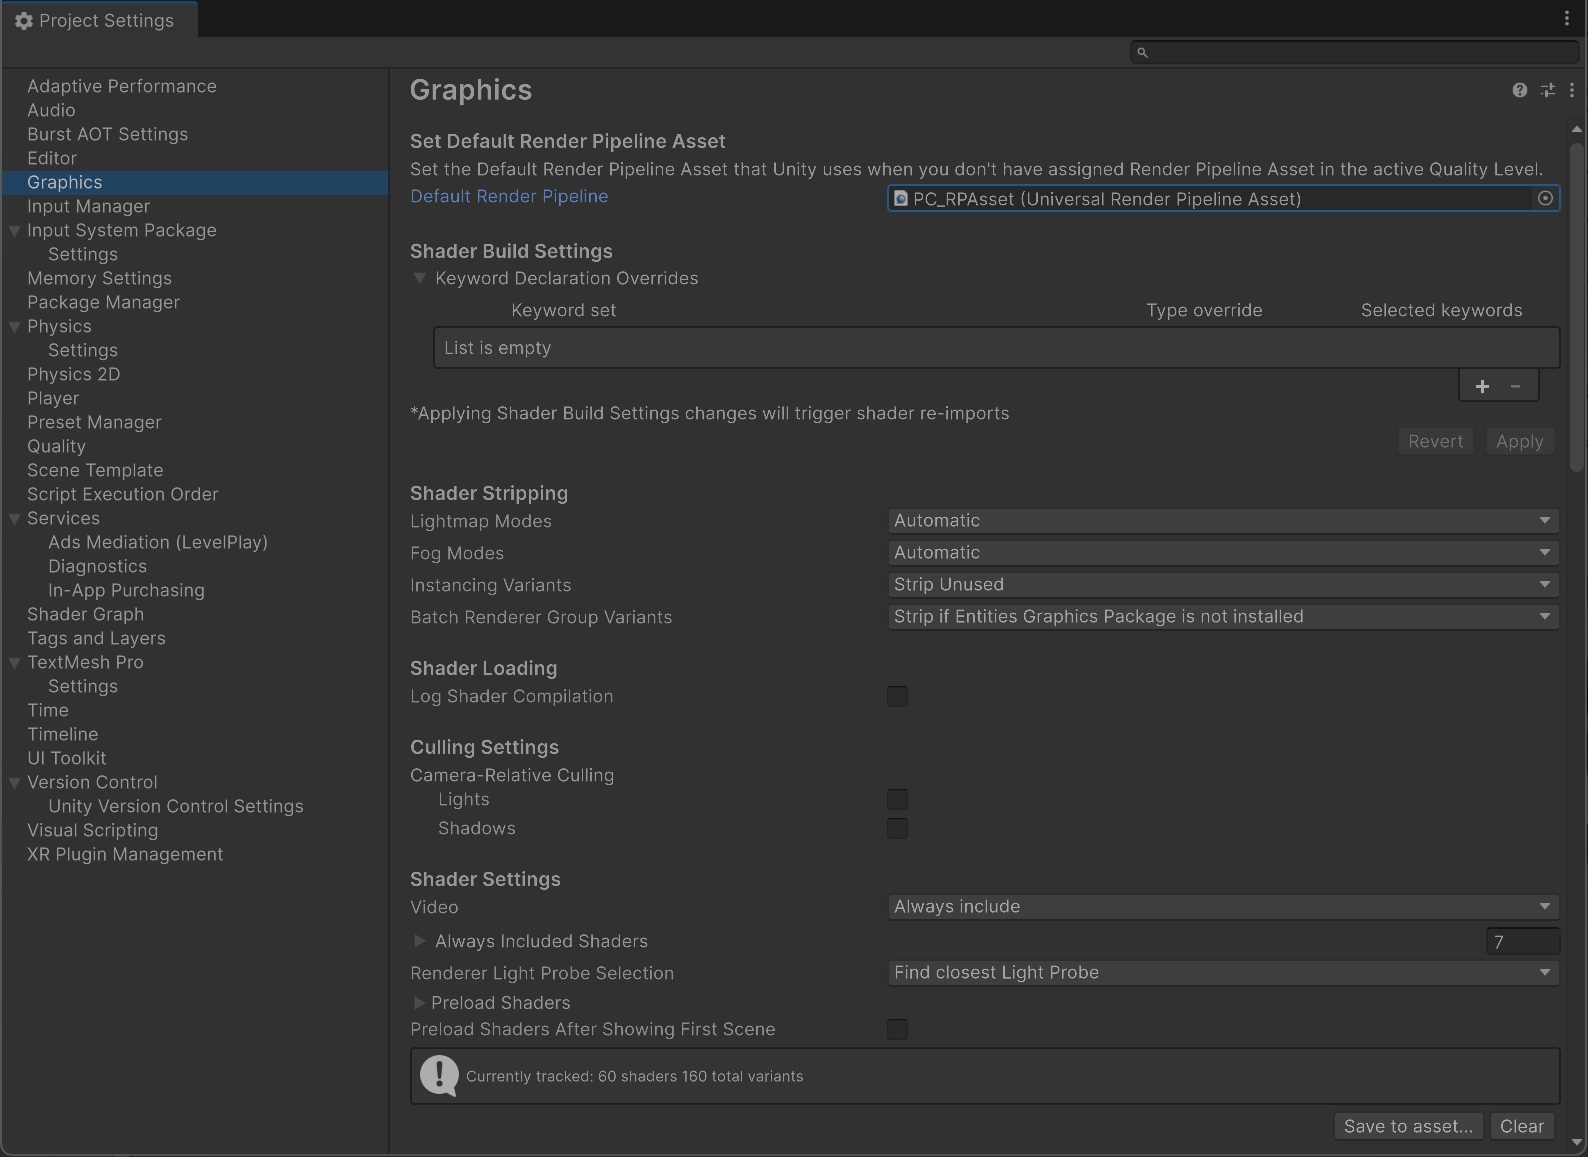
Locate your URP Render Pipeline Asset file
In the menu bar select File > Project Settings > Graphics > Default Render Pipeline to find the Universal Render Pipeline Asset file that is in use as the default pipeline (usually named something like PC_RPAsset.asset):
Click on the render pipeline asset file to locate it in the Project view and select it to view it in the Inspector:

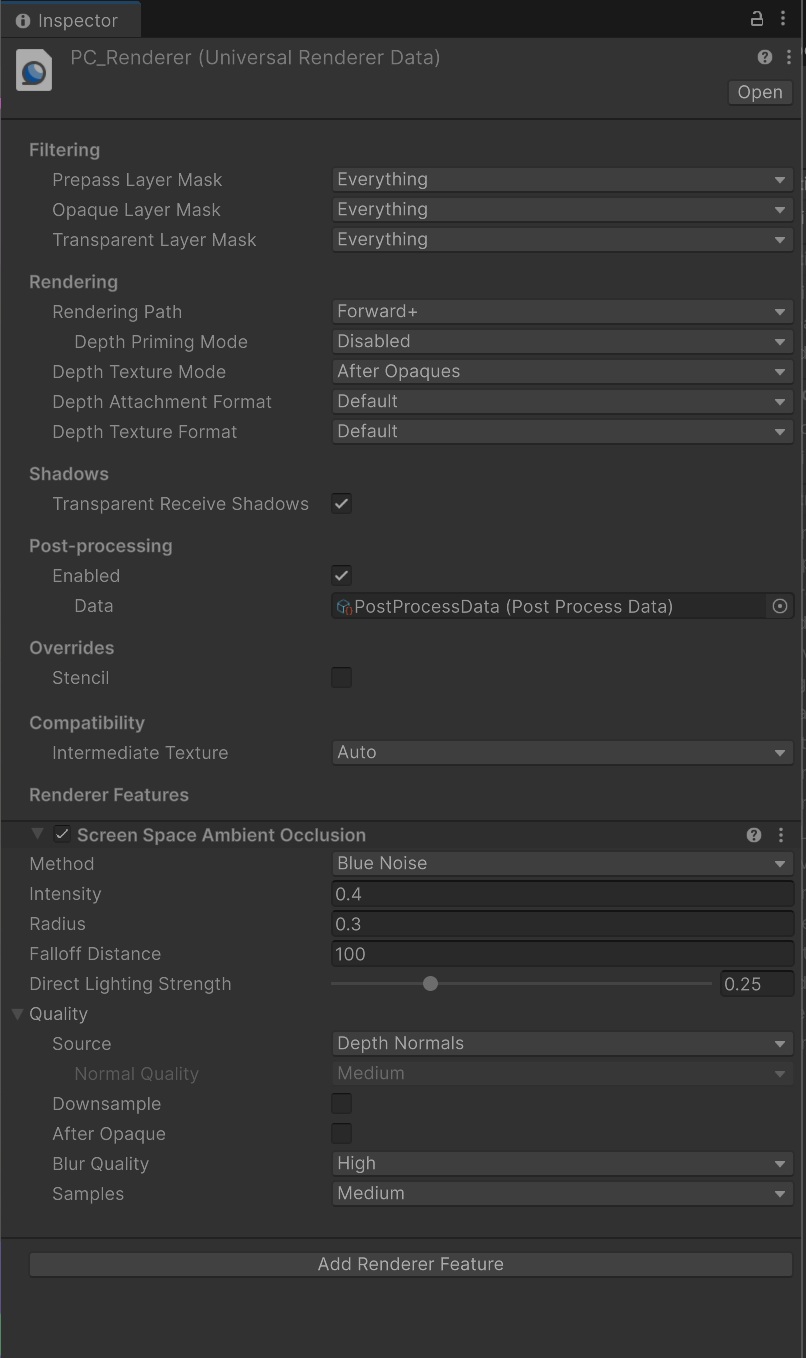
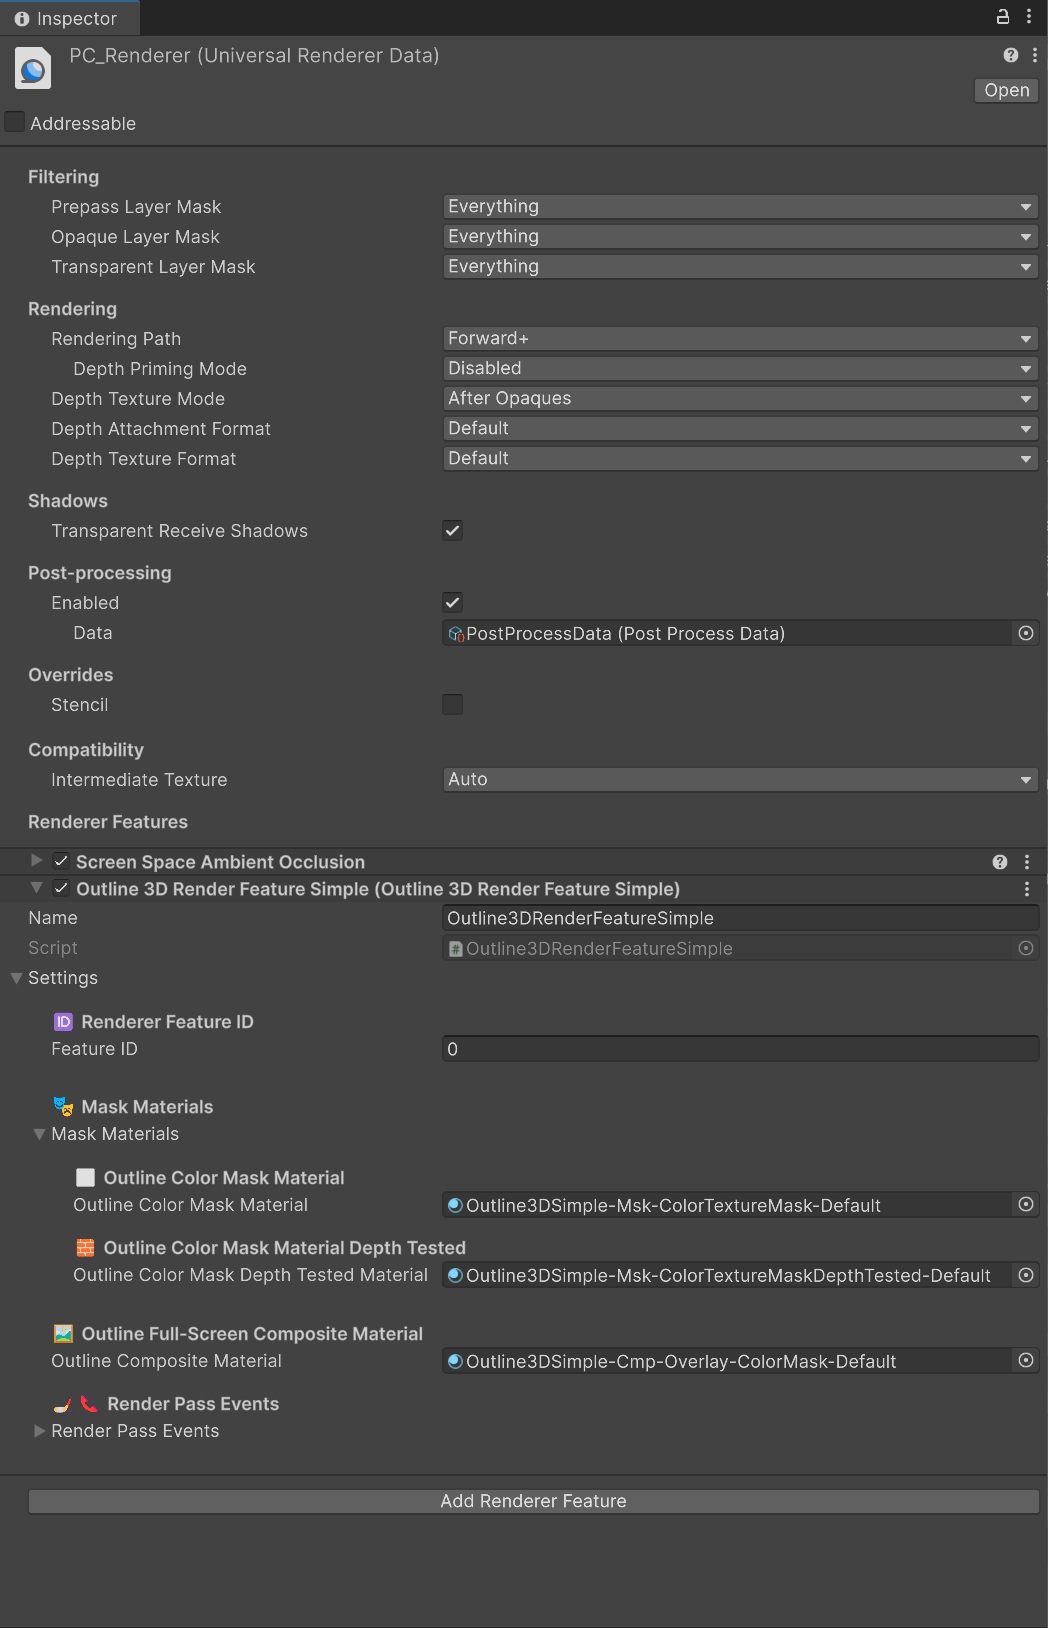
Locate your Universal Renderer Data file
Click on the default Renderer from the Renderer list to locate the file in the Project view, (usually named something like PC_Renderer.asset) select it and croll down to Renderer Features:
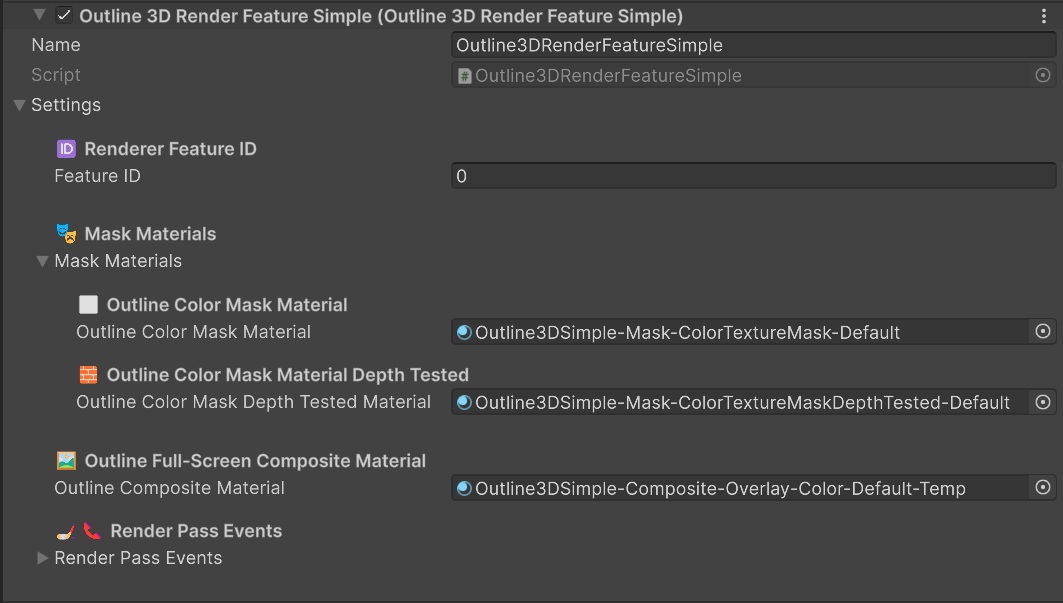
Add the Outline Renderer Feature
Click Add Renderer Feature and select
🧑🎨Outline3DRenderFeatureSimpleto add the feature to you URP Renderer:
3️⃣ Create and Assign a Simple Composite Outline Material
After adding the Renderer Feature, you can choose and assign one of the compatible Simple Full-Screen Outline 🖼️Composite Shader Graph materials to the Outline Composite Material slot of the 🧑🎨Outline3DRenderFeatureSimple.
The feature automatically adds the default Masks and Composite materials which can be swapped for custom ones.
The default Composite material is in fact not really an outline but a simple color overlay which is the cheapest of all the Composite shaders since it doesn't require any edge detection.
The simplest and cheapest actual outline Composite shader is the Outline3DSimple-Cmp-Silhouette-Outline.shadergraph shader.
Almost all of the Outlines use the default Mask materials, since they're only needed to generate the texture masks with that the Composite shader uses to 'cook' or calculate, and 'serve' or draw, the different types of outlines to the screen.
So for switching to a different outline only the Full-Screen Composite shader needs to be swapped!
ℹ️ With the exception of the Pro Tier JFA Contour Distance Field outlines, which require a special contours JFA UV seeds mask instead of the default silhouette JFA UV seeds mask.
See the🧑🎨Outline3DRenderFeaturePropage for more info
When adding the Outline3DRenderFeature to your Renderer Features the Outline3DRenderFeature will try to find and assign the default mask materials and will also automatically assign the included sub-asset material file of the default final Composite Shader Graph directly from the .shadergraph asset.
Because this material belongs to the .shadergraph file, the properties of the shader (_OutlineColor and _OutlineThickness etc.) cannot be changed in the Inspector so you probably want to create your own outline material that uses one of the outline composite shaders, so that you can change and tweak all of the outline properties of the shader. To do this there are two ways:
Method 1: Copy the Shader Graph sub-asset material
Steps:
- Select a composite outline Shader Graph file from the OutlineSystem Shaders folder in the Project View.
- fold it open and select the internal sub-asset Material of the Shader Graph file.
- With the Shader Graph sub-asset Material selected press Crl+D or Cmd+D to duplicate the material to a separate .mat material file.
- Assign the material to the Full-Screen Composite material slot of the Outline3DRenderFeature.
Method 2: Create a new Material and assign the Composite shader to it
Steps:
- Right click in the Project view and create a new Material.
- Select the material and in the Inspector change the shader for the material to one of the OutlinSystem's Composite shaders.
- Assign the material to the Full-Screen Composite material slot of the Outline3DRenderFeature.
ℹ️ When the required mask materials and composite material are not assigned the effect will not run.
Alternatively you can copy one of the sample Composite Outline materials included with this system!
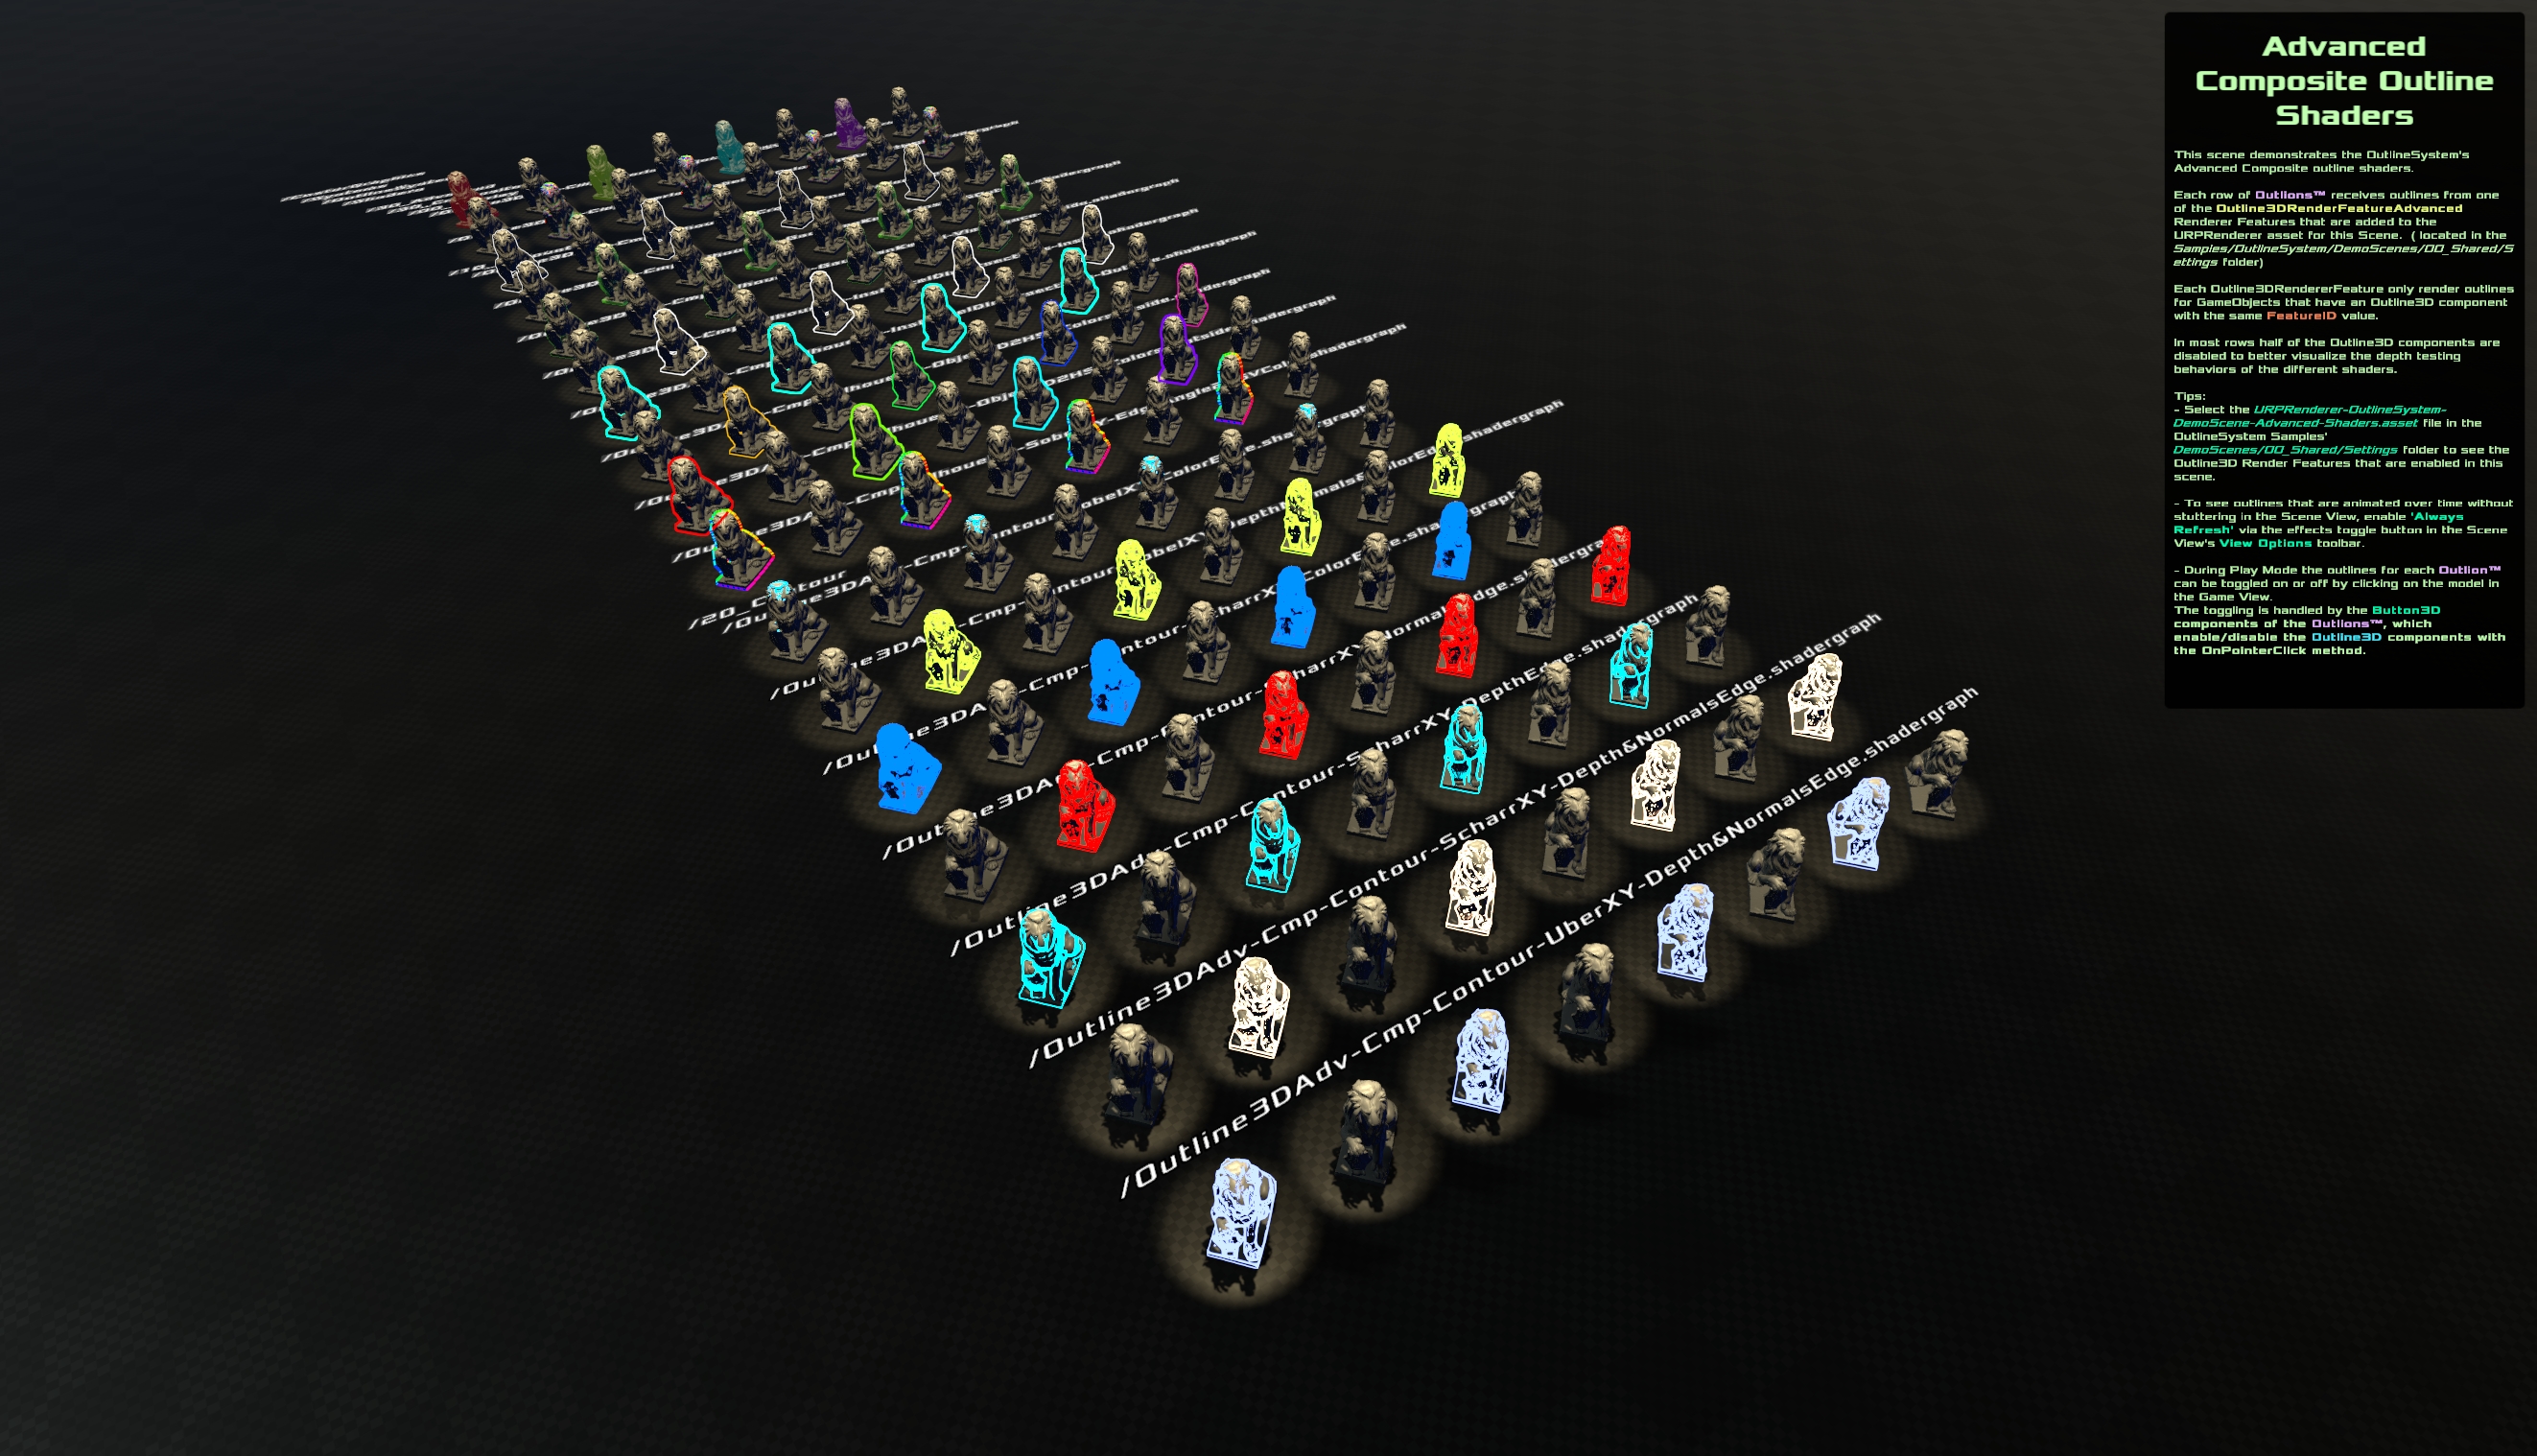
The OutlineSystem includes a large collection of pre-made Composite shader outline materials, each designed to show the unique capabilities of each shader tier. Demo scenes are also included to showcase the shaders in the scene and to showcase features such as per-object ObjectID data, customizable outline colors for individual objects or teams, and advanced edge-detected per-object outline intersections.
You can find the collection of outline materials and demo scenes in the OutlineSystem's Samples folders.
4️⃣ Test the Outline in Play Mode
You should now see:
- All objects with
🔳Outline3Drendered into the mask - The composite pass applying an outline around them
If the outlines don't appear:
- Ensure all materials of the
🧑🎨Outline3DRenderFeatureare assigned - Make sure the
🔳Outline3Dcomponent and Outline3DRenderFeature have the same🆔FeatureID - Make sure the
🔳Outline3Dcomponents have their Renderers and/or child Renderers assigned - Make sure the Composite shader is of the same Tier or has a lower Tier than the
🧑🎨Outline3DRenderFeaturethat uses it. - Check if the mask texture is created
- Ensure the Outline3DRendererFeature executes before post-processing
⚠️ About Outlines in the Scene View
If Outlines aren't visible in the Scene view
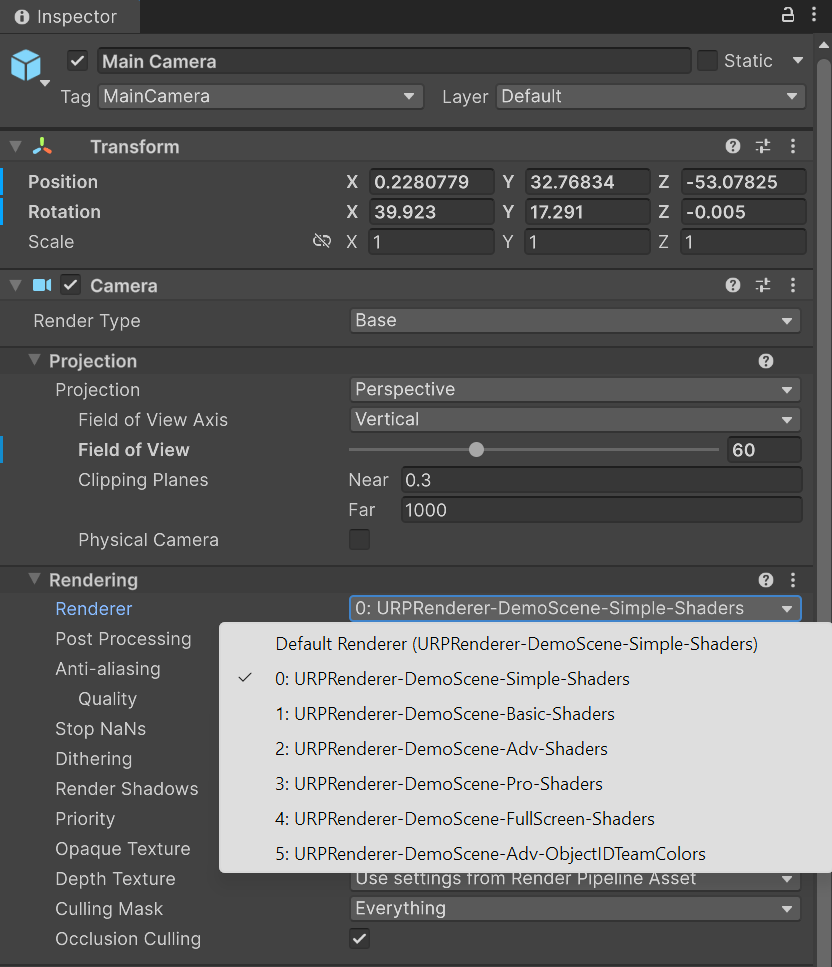
If you only see the outlines in the Game View but not in the Scene View then make sure that your Universal Render Pipeline Asset's default Renderer is set to the one with the 🧑🎨OutlineRenderFeature:
Unity let's us override the default Renderer on a per-camera basis, so you can have different Renderers for different scenes, but the Scene View camera uses the Renderer that is set as the default!
If Outlines are much thicker in the Scene View than in the Game View
Because the outlines are a full-screen effect, depending on the type they may be influenced by the camera's near and far plane distances. If the Scene View camera uses a different near and far plane distance as the Game View camera it can cause a mismatch between displayed outline thicknesses. By default Unity uses Dynamic clip distances for the Scene View camera but this setting can be turned off via the Scene View Tool Bar.
To get the same thickness of outlines shown in the Scene View as in the Game view, disable Dynamic Clipping and set the Scene View Camera's Near and Far plane distances to the exact same values as used for the Game View camera. For instance to 0.3 - 1000:
